I hope to keep this post updated with invaluable PhotoShop tips geared towards web developers. Web developers often received “PSD mock-ups” and are tasked to build a web site based on the PSD layout. I’ve been doing this for many years and haven’t really kept a log of what I’ve learned – until now.
Quickly grabbing a color’s hex code
 I used to use the eyedropper tool to click on a pixel, then bring up the color window, select the hex code, then copy it. Recently, I discovered a trick that cuts that time in half.
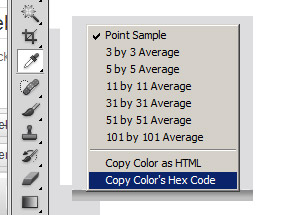
PhotoShop CS5 introduced the “Copy Color’s Hex Code” contextual menu item to the eyedropper tool. To use it, simply select the eyedropper and right-click on a pixel.
Removing a white background
Occasionally, I find myself on the receiving end of a layout file which was created using graphics software that I don’t have. So, I usually end up requesting a PDF or JPEG image.
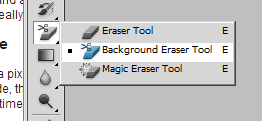
 Although, the majority of the time, there are elements which require that the background be removed from them. Normally, in a layered PSD file, this isn’t necessary. You can do a decent job of removing a background color from an element using the Background Eraser tool. Depending on how smooth the edges of the element are, this can do a superb job. It really depends on the case.
Once you’ve selected the background tool, typically, you want to choose a very large brush size, then start clicking away at the background color
Quick transformations to fix unusable images
Ever get an image that’s shot at the wrong angle, is a little askew or doesn’t match the perspective of other related images? Sometimes we web developers are tasked with placing imagery, but are provided with photos that were taken by amateur photographers or that just don’t work in the given setting.
Photoshop offers a nice group of image transformations which are quick to access and even quicker to use. To access them:
- Choose the layer you wish to tranform.
- Right click anywhere on the canvas, then choose Free Transform.
- Right click again on the canvas, then choose the desired transform.
Color Matching
Designers may have a term for it, but I’m a web developer, so I call it color matching! Have you ever been asked to add an image to a site or banner that just doesn’t blend well with the rest of the theme?
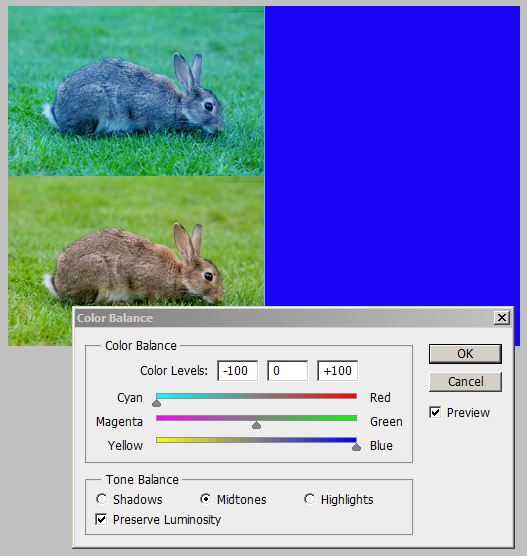
There’s an easy way to manipulate the colors within the image to bring the image up to speed with the rest of the color scheme. Photoshop calls it Color Balance. It’s available within the Image -> Adjustments menu.
You first choose a layer, then open the Color Balance tool. From there, you’ll be able to “shift” the colors in the image closer to the color that you are trying to match. See the image below for an example:
Grabbing text size color from a non-layered file (JPG, PNG, etc)
Often times, you’ll be dropped a “flat” PNG or JPEG layout file from a designer. One of the most difficult things to deal with is getting the text size and color to match up.
Getting the text size can be done by grabbing the selection tool and selecting the height of the text. That is the text height in pixels.
Getting the color though is another story. Because of the way anti-aliasing introduces different shades of a text color, it can difficult to know what the expected color of the text should be.
The best rule to follow is to zoom in significantly on the text, then use the color grabber to select the darkest color within the text. This is the text’s true color. The other lighter colors are used to anti-alias the text.

