Using PhoneGap (now called Cordova) to develop native iPhone apps has been awesome! I’ve successfully released one app, and continued on to release an enhanced version of the app. A month later, my second app is ready for submission, and as expected, I’ve entirely forgotten the process. So, in a somewhat selfish act, I’m creating this post not only for others, but as a guideline to myself!
- This goes without saying, but it’s a good idea to fully test your app on as many devices as you have available. If you have an old 2nd generation iPod laying around, awesome, use it! Otherwise, make good use of the available simulators that come with XCode (some you may have to download).Don’t just test it yourself, hand the controls over to a non-developer, your colleague, girlfriend, spouse, kids, anyone who doesn’t quite know what to expect, and is more likely to act as a typical user would.
- Create a distribution provisioning profile. https://developer.apple.com/ios/manage/overview/index.action
Provisioning -> Distribution -> New Profile - The fields are pretty clear on this portion. After submitting, wait a minute or two, then refresh the page. The time from pending to active usually isn’t much longer than that.
- Download the distribution provisioning profile.
- Open up the organizer from XCode, by choosing Window -> Organizer from the menu.
- Drag the profile that you just downloaded into the Organizer Window, specifically, the Library -> Provisioning Profiles area.
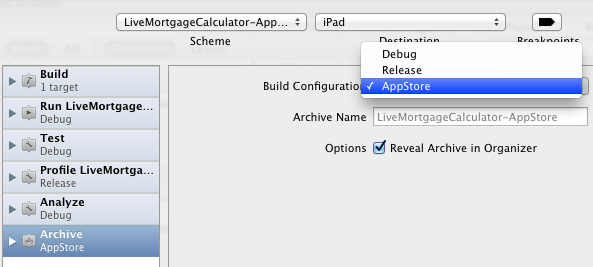
- Create an Archive of the App

Duplicate your release build configuration as shown above. Apple suggests naming the new configuration “AppStore”.- Switch to the Build Settings tab, you’ll notice your new configuration, called AppStore. Within that configuration, change the Code Signing Identity through your new Distribution Provisioning Profile that you created in the steps above.
Although not noted by Apple, it appears that you need to make sure that Any iOS SDK be set to iPhone Distribution.Change: The “iPhone Distribution” option was available on earlier Xcode versions, but I no longer see it.
- At this point, Apple’s instructions suggest “In the target, delete the Validate Build Product build setting specification for the Release build configuration.”However, there doesn’t appear to be an option to delete the build setting. Instead, I’ve opted to choose a value of No, as shown below.
- Create a New Scheme to build your App
- Validation – The steps above will bring up the Organizer, at which point, you should click the ‘Validate’ button to validate your app.
- Fix any issues, then rerun Product -> Archive
- At this point, you may wish to do some cleanup and delete previous Archives that did not validate.
- Congratulations! You’ve completed the steps above, now just click ‘Distribute…’ and follow the instructions.


Do you have any advice for making certain build files not copy into the final archive?
For example, we have www / css / less / [bunch of .less files that get output to .css in www/css] … is there a way to not include the less folder and its contents in the final archive, that you know of?
How are the .less files generating the CSS?
Thanks for this article, the Apple docs are an absolute pain in the arse to interpret.